Repairing damaged electrical outlets in an older home requires caution and adherence to safety guidelines to prevent electrical hazards and ensure the proper functioning of the electrical system. As older homes may have outdated wiring and components, it is essential to approach outlet repairs with care and attention to detail. Here is a comprehensive guide on how to safely repair damaged electrical outlets in an older home:
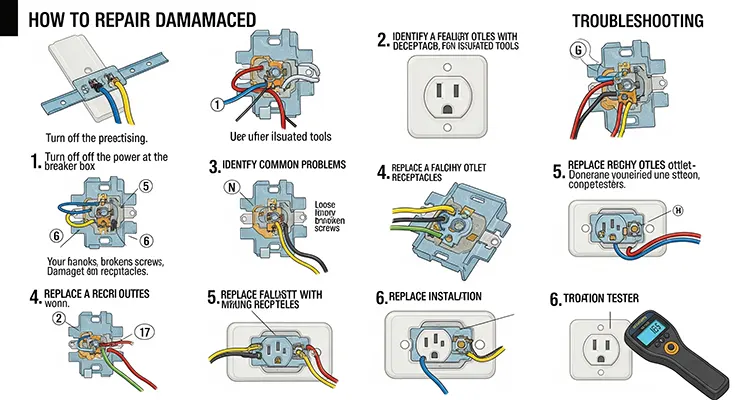
1. Assess the Damage:
- Before starting any repairs, carefully examine the damaged electrical outlet to identify the cause of the issue. Common problems include loose connections, cracked faceplates, or exposed wiring. Ensure the power to the outlet is turned off at the circuit breaker to avoid electrical shock.
2. Gather the Necessary Tools:
- To repair damaged electrical outlets, you will need basic tools such as a screwdriver, wire stripper, voltage tester, and replacement outlets or components. Ensure that you have the appropriate tools and materials before beginning the repair process.
3. Turn Off the Power:
- Prior to repairing the damaged outlet, turn off the power supply at the circuit breaker panel to prevent the risk of electric shock. Use a voltage tester to confirm that the outlet is not live before proceeding with any repairs.
4. Replace Faulty Components:
- If the outlet is damaged beyond repair or showing signs of wear and tear, replace it with a new outlet. Follow the manufacturer’s instructions for installation and ensure all connections are secure. Replace cracked faceplates to prevent exposure to live wiring.
5. Check for Grounding:
- Older homes may not have grounding in all outlets, which can pose a safety risk. Consider upgrading outlets to grounded receptacles to enhance electrical safety and protect against electrical shocks or fires.
6. Inspect Wiring Connections:
- Inspect the wiring connections at the outlet for signs of damage, corrosion, or loose wires. Properly rewire the outlet if necessary, ensuring connections are secure and in compliance with electrical codes.
7. Test the Outlet:
- Once the repairs are complete, turn the power back on at the circuit breaker and test the outlet using a plug-in device or a multimeter to ensure it is functioning correctly. Verify that all outlets in the circuit are working as intended.
8. Seek Professional Help if Needed:
- If you are uncertain about the repair process or encounter complex electrical issues, it is advisable to seek the assistance of a qualified electrician. Professional electricians have the expertise to handle electrical repairs in older homes safely and efficiently.
Repairing damaged electrical outlets in an older home requires a cautious approach and adherence to safety practices to mitigate electrical risks. By assessing the damage, turning off the power supply, replacing faulty components, checking for grounding, inspecting wiring connections, and testing the outlet post-repair, homeowners can ensure the safe and effective repair of damaged outlets. When in doubt, always consult a licensed electrician to address electrical concerns in older homes and maintain a safe living environment for you and your family.